Frame-14

Privacy Ninja

        • DATA PROTECTION

        • CYBERSECURITY

        • Secure your network against various threat points. VA starts at only S$1,000, while VAPT starts at S$4,000. With Price Beat Guarantee!

        • API Penetration Testing
        • Enhance your digital security posture with our approach that identifies and addresses vulnerabilities within your API framework, ensuring robust protection against cyber threats targeting your digital interfaces.

        • On-Prem & Cloud Network Penetration Testing
        • Boost your network’s resilience with our assessment that uncovers security gaps, so you can strengthen your defences against sophisticated cyber threats targeting your network

        • Web Penetration Testing
        • Fortify your web presence with our specialised web app penetration testing service, designed to uncover and address vulnerabilities, ensuring your website stands resilient against online threats

        • Mobile Penetration Testing
        • Strengthen your mobile ecosystem’s resilience with our in-depth penetration testing service. From applications to underlying systems, we meticulously probe for vulnerabilities

        • Cyber Hygiene Training
        • Empower your team with essential cybersecurity knowledge, covering the latest vulnerabilities, best practices, and proactive defence strategies

        • Thick Client Penetration Testing
        • Elevate your application’s security with our thorough thick client penetration testing service. From standalone desktop applications to complex client-server systems, we meticulously probe for vulnerabilities to fortify your software against potential cyber threats.

        • Source Code Review
        • Ensure the integrity and security of your codebase with our comprehensive service, meticulously analysing code quality, identifying vulnerabilities, and optimising performance for various types of applications, scripts, plugins, and more

        • Email Spoofing Prevention
        • Check if your organisation’s email is vulnerable to hackers and put a stop to it. Receive your free test today!

        • Email Phishing Excercise
        • Strengthen your defense against email threats via simulated attacks that test and educate your team on spotting malicious emails, reducing breach risks and boosting security.

        • Cyber Essentials Bundle
        • Equip your organisation with essential cyber protection through our packages, featuring quarterly breached accounts monitoring, email phishing campaigns, cyber hygiene training, and more. LAUNCHING SOON.

Useful Registry Hacks To Optimize Your Windows 10 Experience

Useful Registry Hacks To Optimize Your Windows 10 Experience

Registry

Windows 10 is packed with useful settings that can improve your experience, but many features simply can’t be accessed in Settings or Control Panel.

Using the Windows Registry editor, you can enable hidden features in Windows 10 that not only provide more information, but improve your experience in Windows 10.

It should be noted that the Registry Editor is a powerful tool, and it is recommended that you first create a backup of the registry before making any changes.

Doing so allows you to restore the backup and recover the system if you incorrectly edit or delete Registry entries.

Below are the highlighted registry hacks that you should know about to enhance your experience using Windows 10.

Disabling Bing Search in Windows Search

Windows Search comes with the Bing search engine integration, and it allows you to find the content on Bing when a local search fails to find anything.

If you don’t like Bing due to privacy or performance issues or if it’s causing problems, you can disable it via the Registry.

Please follow these steps to disable Bing Search in Windows 10:
  1. Open Windows Search.
  2. Search for Registry Editor and click to open it.
  3. When Windows will display a UAC asking your permission to launch the editor, simply press the Yes button to continue.
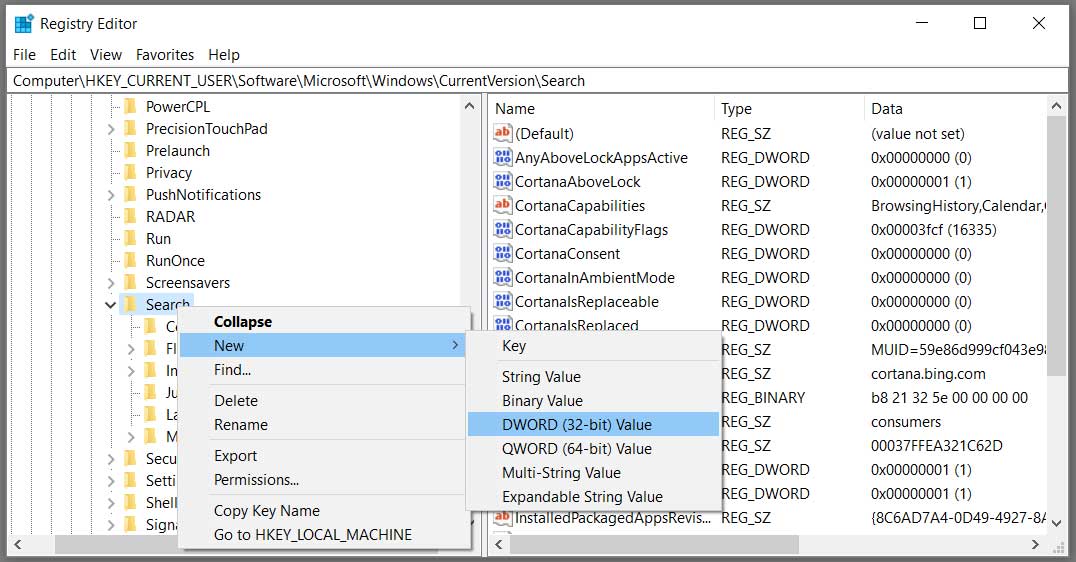
  4. In Registry Editor, navigate to the HKEY_CURRENT_USER\Software\Microsoft\Windows\CurrentVersion\Search key.
  5. Right-click on Search and select New DWORD (32-bit) Value as shown below.New DWORD
  6. Type BingSearchEnabled to create the new value.
  7. Double-click on BingSearchEnabled and set the value to 0 and press the OK button.
  8. Under the same location, locate CortanaConsent.
  9. Double-click on it and change the value to 0 and then press the OK button.
  10. Close the Registry Editor and restart Windows Explorer or restart Windows 10.

After making the above changes to the Registry, Windows 10 will now look for local search results such as documents, pictures, files, apps, or settings. If there are no local results, Windows will then display a blank page.

Disabling the Windows 10 lockscreen

The lock screen feature of Windows 10 could be unnecessary when you don’t have a touch-enabled display. While there are several settings available in Windows 10 that you can modify to improve the lock screen experience, you can also remove it by editing your Registry.

To disable the Windows 10 lockscreen, follow these steps:
  1. Open Windows Search.
  2. Search for Registry Editor and click to open it.
  3. When Windows will display a UAC asking your permission to launch the editor, simply press the Yes button to continue.
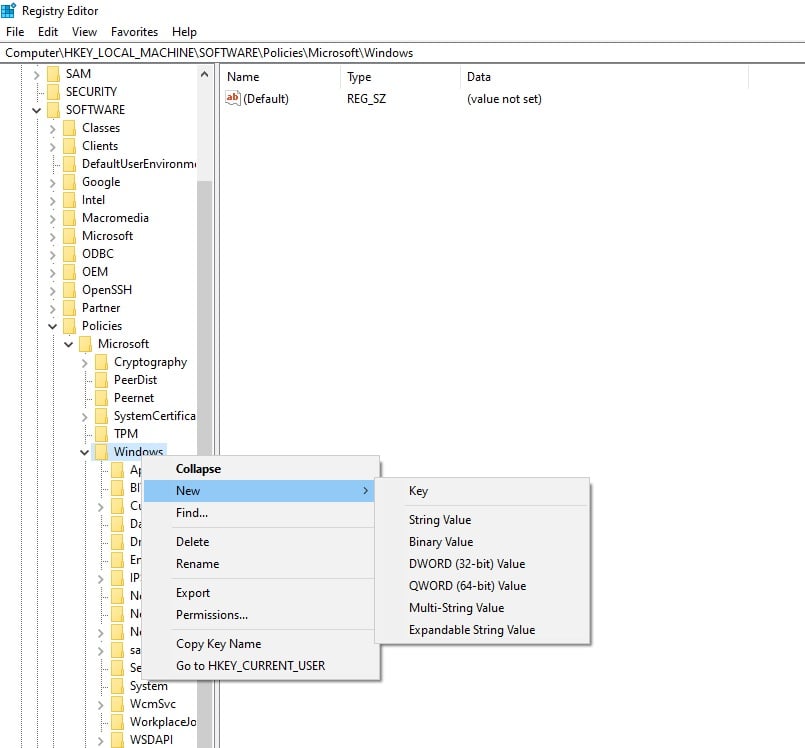
  4. In Registry, double-click HKEY_LOCAL_MACHINE
  5. Navigate to \SOFTWARE\Policies\Microsoft\WindowsRegistry
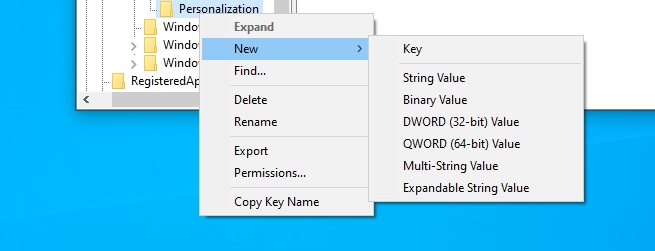
  6. Under the Windows folder, create a key called “Personalization.”Personalization
  7. Right-click the new Personalization key you just created.
  8. Select New | DWORD (32-bit) Value.NoLockScreen
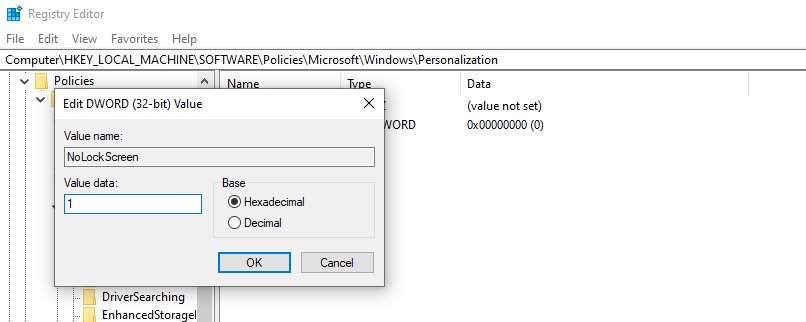
  9. Enter NoLockScreen as the name.
  10. Double-click the entry and change the value to 1.

Once this key is created, the Windows 10 lock screen will be disabled.

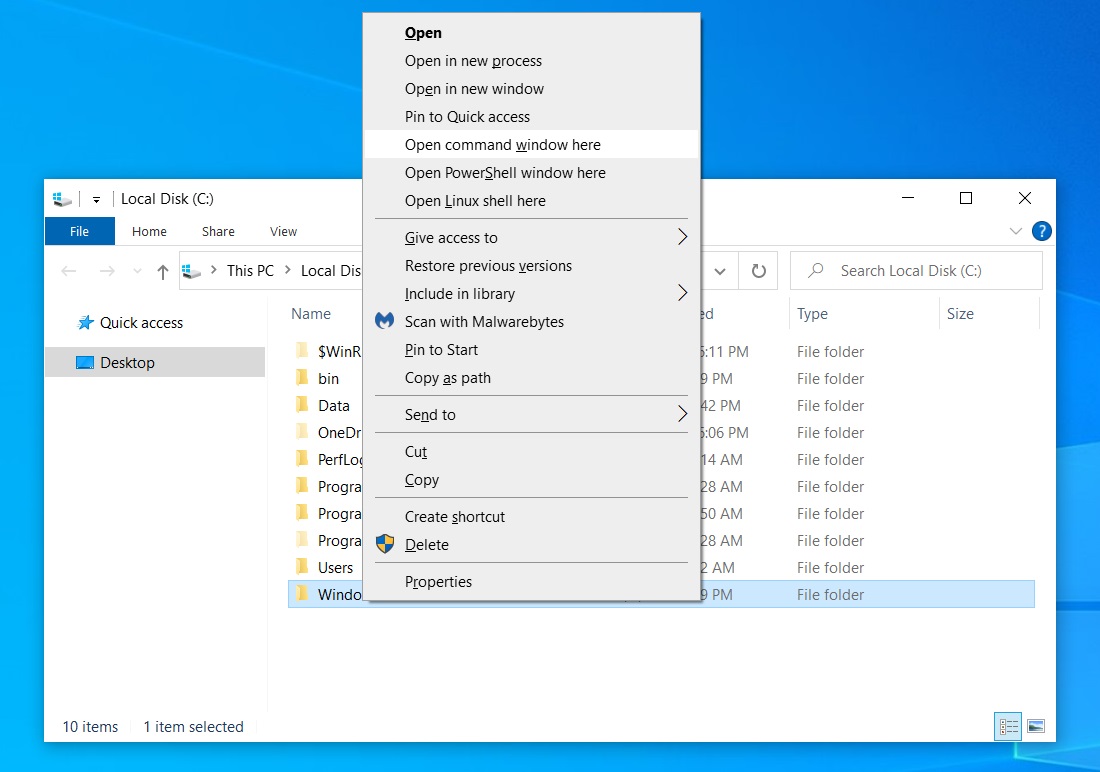
Add ‘Open command window here’ to the File Explorer context menu

By tweaking your Registry, you can also restore the context menu option to open a Command Prompt window and have it open automatically in a specific folder, as shown below.
Cmd

To add ‘Open command window here’ to the context menu, follow these steps:
  1. Open Windows Search.
  2. Search for Registry Editor and click to open it.
  3. When Windows will display a UAC asking your permission to launch the editor, simply press the Yes button to continue.
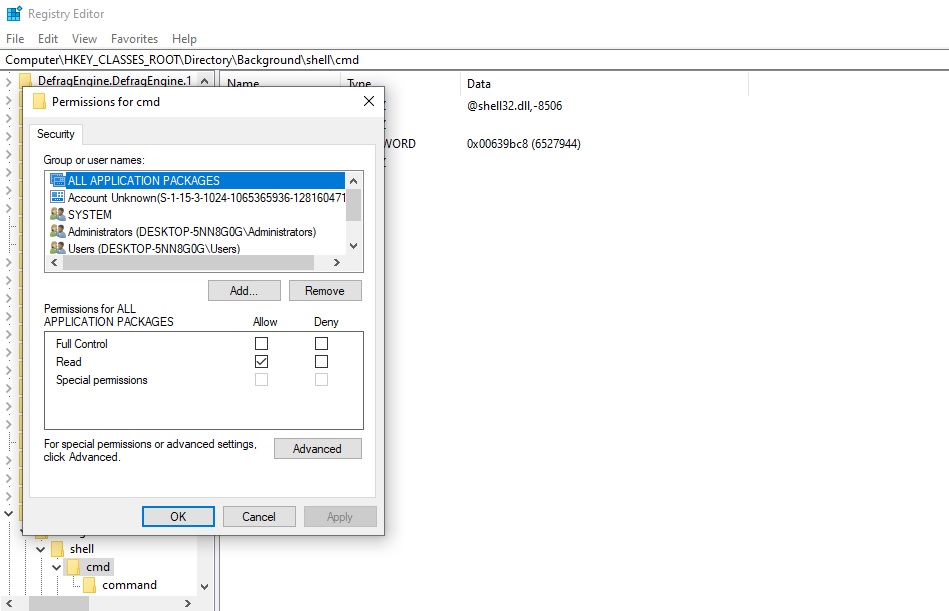
  4. Navigate to HKEY_CLASSES_ROOT\Directory\Background\shell\cmd
  5. Right-click the cmd (folder) key.
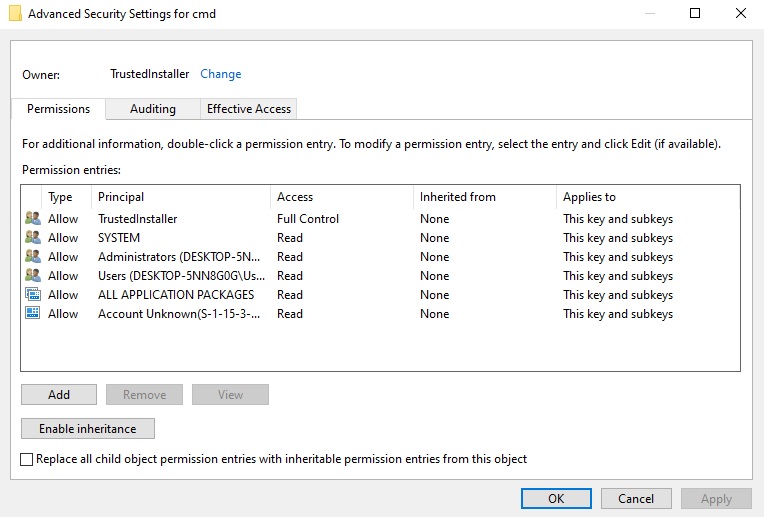
  6. Click Permissions and then click the Advanced button.Registry
  7. On “Advanced Security Settings,” select the Change link next to “TrustedInstaller” owner.Permissions
  8. Type your account name in the provided field.
  9. Click Check Names to verify your account name.
  10. Click OK.
  11. Check the Replace owner on subcontainers and objects option.
  12. Click the Apply button and click on OK.
  13. Navigate to “Permissions,” select the Administrators group.
  14. Enable Allow for the Full Control option.
  15. Click the Apply button and click on OK.
  16. Navigate back to the Registry folder ‘cmd’ and right-click the HideBasedOnVelocityId DWORD.
  17. Click Rename.
  18. Change the DWORD name from HideBasedOnVelocityId to ShowBasedOnVelocityId.
  19. Press Enter.
  20. Restart Explorer.exe

Once you restart Explorer, if you hold Shift and right-click on a folder, you will now see the context menu named Open command window here.

Also read: 7 Client Data Protection Tips to Keep Customers Safe

Display seconds on the taskbar clock

By default, the taskbar of Windows 10 shows only the hour and minutes and does not provide a built-in option to also show the seconds.

Fortunately, you can modify your registry and enable support for seconds on Windows 10’s taskbar clock, as shown below.

Taskbar clock

To display seconds on the taskbar clock, follow these steps:
  1. Open Windows Search.
  2. Search for Registry Editor and click to open it.
  3. When Windows will display a UAC asking your permission to launch the editor, simply press the Yes button to continue.
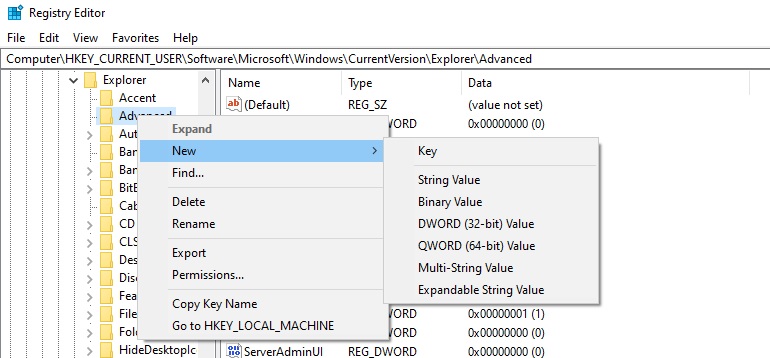
  4. Navigate to HKEY_CURRENT_USER\Software\Microsoft\Windows\CurrentVersion\Explorer\Advanced
  5. Right-click the advanced or its background and choose New > DWORD (32-bit) Value.Registry
  6. Name the key “ShowSecondsInSystemClock”.
  7. Double-click the value and change it to 1.
  8. Click “OK.
  9. Close Registry editor.
  10. Sign out and sign back to see the changes. You can also restart Windows.

Enable Verbose mode in Windows 10

With a tweak to the Registry, you can boot your Windows 10 PC into “Verbose mode” and get more detailed information and extremely helpful when troubleshooting problems.

This mode will display the specific step the operating system is on while booting up and shutting down Windows 10.

This mode allows you to troubleshoot startup and shutdown issues to see the specific steps are being performed when a problem occurs.

Mode

Verbose mode is a feature that you should enable only when you’ve technical knowledge to troubleshoot critical problems in Windows.

To enable ‘Verbose’ mode, please follow these steps:
  1. Open Windows Search.
  2. Search for Registry Editor and click to open it.
  3. When Windows will display a UAC asking your permission to launch the editor, simply press the Yes button to continue.
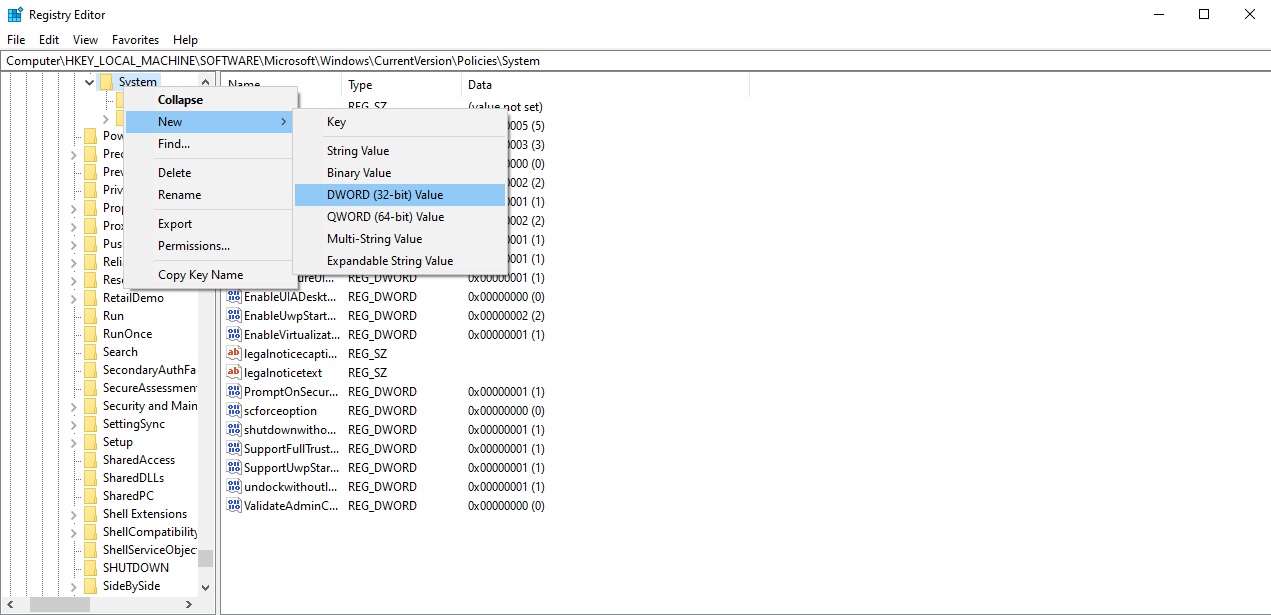
  4. Navigate to HKEY_LOCAL_MACHINE\SOFTWARE\Microsoft\Windows\CurrentVersion\Policies\System
  5. Right-click the System folder.
  6. Select New DWORD (32-bit) Value.DWORD
  7. Name it “VerboseStatus“.
  8. Double-click VerboseStatus and change its value to 1.
  9. Click OK.
  10. Close Registry editor.
  11. Reboot.

Once this setting is enabled, you will find both your shutdown and the boot-up process is more ‘verbose’ as it displays each step along the way.

Also read: 9 Policies For Security Procedures Examples

0 Comments

KEEP IN TOUCH

Subscribe to our mailing list to get free tips on Data Protection and Data Privacy updates weekly!

Personal Data Protection

REPORTING DATA BREACH TO PDPC?

We have assisted numerous companies to prepare proper and accurate reports to PDPC to minimise financial penalties.
×

Hello!

Click one of our contacts below to chat on WhatsApp

× Chat with us